
'Schild en Vriend' is an old Flemish battlecry, used in the rebellion of the city of Brugge against the French, May 18, 1302. Legend tells that it was used to differentiate between the French-speaking (who could not pronounce 'schild') and Flemish-speaking citizens. Nowadays, historians tell us that it was probably 'Des Gilden Vriend'.

Look out of your window. Chances are you won't have to look very far before you see a hill or elevation of some sorts, even if it is only a local little rise in the ground. Now imagine you were a soldier of an army having to fight over the ground you see out of your window. Apart from all other factors, you'll appreciate that even a small amount of rising and falling in the ground will limit your field of view and therefore your awareness of other people and things on the battlefield. If we want to wargame any battle we have to simulate this rising and falling of the ground in our wargame terrain.
If we had chosen to build a fixed terrain, we could have modeled actual terrain, including it's rising and falling nature, exactly the way we saw it out of the window, but for a flexible terrain, some compromises have to be made. The way most wargamers deal with simulating relief in terrain is to build seperate hill and mountain models which, when combined with the base surface of the terrain setup, give a somewhat abstracted but satisfactory simulation of what we're after. The rest of this page will deal with some of the methods used to create these model hills.
There or two basic types of hills used for wargaming: either the hill contours are stepped, rising up to different height levels in sudden, discrete steps, or they are more gradual, with a natural slope rising up to the top level. As with all things human, the best solution is probably a compromise between these two extremes, with hills consisting of individually identifiable levels with smooth slopes between them.
Stepped hills

Stepped hills are built up of individual steep edged layers of material, representing different elevation levels. Seen from above, they closely resemble hills on contour maps. Their main advantages are clear-cut delineation of elevation levels, ease of construction and ease of standing miniatures on them. We'll go into each of these below.
Advantages
| With stepped hills, it is easy to determine where each elevation level starts and ends, and which miniature is higher then which other miniature. This is because of the steep edges of most stepped hills, which make it impossible for a miniature to stand on the slope of the hill (as it's non-existant), so that a miniature is either on or off a certain elevation level, with no confusion possible. This helps avoid arguments (as uphill figures usually have an advantage in both hand to hand fighting and firing), which tend to crop up between competitive players. Especially in competion-type gaming, this is often a godsend, and hills seen in terrain used in wargame competition or consequently usually of the stepped type. In more friendly gaming however, most people prefer a looser playing style so this property of stepped hills becomes less important.
A second major advantage of this type of hill is that the miniatures on the hill always have a flat surface to stand on and are thus in no danger of falling or tipping over, as is the case with all but the most shallow sloped hills. |
Disadvantages
| Stepped hills have only one disadvantage: real hills do not look like this. As a consequence, unless they are very well done, the visual appeal of stepped hills will always be considerably less than that of more gradually sloped hill models. That said, there are people who like the more abstract look of this type of hills, and in a way, they do have case. |
Construction
Like all wargames terrain, stepped hills are very easy to create. Materials that can be used to create this hills include:
Once the basic material for the hill has been chosen, construction is straightforward: the individual layers of the hill are cut out of the material and stuck together on top of each other to build the hill. It is often a good idea to not affix the different layers of the hill together permanently, so that they could be used either together in different combinations or individually to create several different hills with the same set of hill models. After the hill layers have been cut out, their top and sometimes their side surfaces as well, are covered with plaster filler and then painted and/or flocked to represent the terrain to be simulated (usually a green shade on top and a brown shade on the sides). Another, faster, option is to skip the plaster filler step altogether and paint/flock the hill material itself, although the added texture of the plaster layer usually result in a much higher visual appeal factor. |
Gradually sloped hills
Gradually sloped model hills most closely resemble real hills in that their slopes rise up from ground level to the top of the hill in one continuous sweep without artificial steps or levels. Their major advantage is this realism, but this very fact makes them quite ill-suited for miniature wargame use. Unless the slopes are very shallow (not rising up at anything sharper than say 20 degrees), there is no way short of glueing them on for miniature figures to stand on them. Therefore, this type of model hill is usually found in static displays or in model railroad setups.
The common solution: gradually stepped hills
Most wargamers, being the resourceful fellows they are, resort to a compromise between the above two extremes. Model hills are built up of individual layers, just like the stepped hills above, but sides of these layers are usually sloped to a certain degree to improve the visual appeal of the hill. This combines some of the advantages of both stepped and gradually sloped hills. At Schild en Vriend, the majority of the hills we use is of this type, as we find them the best compromise between visual appeal and useability in wargames.
Construction
| Gradually stepped hills are constructed in the same way as stepped hills above, but instead of cutting out the layers with steep edges, the edges are given a slope. It is often easiest to cut out the hill shapes with steep edges first, and then cutting away some of the material from the edges to create the slope wanted. This slope can be quite steep or it can be kept shallow to enable miniature figures to stand up on it without falling over. |
Some examples of hills in wargame terrain
 A gradually stepped hill with steep slopes. This is a modular hill consisting of individual compatible pieces. For more information on building such pieces, click here | 
A stepped hill, made from expanded polystyrene |  Another steep sided gradually stepped hill. This one belongs to the Stipsciz Hussars, a fellow Belgian wargame club. |  Another of the Stipsciz Hussars' hills. This one illustrates that hills must be very shallowly sloped in order to have the miniatures stand on them. |
To represent mountains on the tabletop, one usually goes for an even more symbolic and abstract representation than for hills, as a realistic mountain model would be very awkward in practical wargaming use. However, combined with suitable simple rules for movement in mountains, they can give a good representation of mountains for game purposes.
Construction
| Mountain models for wargaming are usually constructed using a similar technique as the one used for the stepped hills above. The mountain model is built from one or more layers of some material (usually expanded polystyrene) with the sides cut to resemble steep-sided cliffs, to differentiate the mountain from hill models. The individual layers are usually thicker than for the hills as well, so the most common material for mountains is expanded polystyrene, as it is both cheaper and easier to cut in the required thickness than other materials such as wood. The sides are then cut to resemble steep cliff sides, by chipping away polystyrene in a 'studied' random fashion (expect a snowstorm). Extra texture can be added by dabbing plaster filler on using a sponge or a piece of paper kitchen towel, and by glueing model railroad ballast or kitty litter in selected places on the cliff side.
Finally, the mountain model is finished, painted and/or flocked just like hill models, but the sides can be painted either in a brown or a grey shade. The side of the mountain can benefit tremendously from a quick drybrushing with an appropriate lighter shade. Note that you could also make more realistic mountains, with steeply sloped sides all the way up, but these are practically useless in gaming except as impassable scenery, as it is quite impossible for miniatures to stand on them. |
 A mountain model example. This one is from the GeoHex Mountainscape, and is modular, so can be set up in any of a number of combinations |  This is a combination hill & mountainside. It was made from layers of polystyrene glued on together and then carved in the shape above. |  Another mountain model. This one is low enough to double as a steep sided hill. |
Game use
| Mountains need a number of special rules in game use, notably regarding movement across and on them. It is for this that the 'layered' construction of the mountains is especially handy.
We find it easiest to restrict mountain movement by simply having a figure spend a full turn's movement when crossing a mountain 'layer' or contour in any direction, while vehicles or cavalry cannot cross at all. Movement on top of the mountain models occurs at reduced speed and cannot be done in formation, while a figure or unit on top of a mountain model gets a protective advantage of some sort, depending on the rules used (e.g. enemy shooting at it has a negative modifier), because it is assumed the unit is hiding behind every rock and stone they can find. |
Mountains, the Major General's way
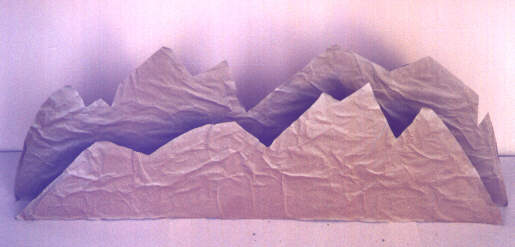
Finally, the Major General Tremorden Rederring has come up with an innovative and extremely attractive and practical way of representing mountains on the tabletop with as little room lost as possible. It involves glueing cardboard mountain contours together, with cardboard spacers in between to act as firing steps for figures in the mountains - further details can be found at the Major-General's site. Knowing a good thing when we see it, we immediately pounced upon the idea and started building our own Rederring-style mountains. Here's a picture of one of these, fresh of the worktable:
 |

Home | This page is maintained by Bart Vetters Schild en Vriend Miniature Wargaming Club Leuven |